
Fatal Claw Interactive Map
Use this Fatal Claw map to explore verified regions, bosses, abilities, NPCs, fast-travel points, and progression gates. Find connected areas, check route requirements, and inspect the evidence behind each relationship.
Fatal Claw Map Overview
Use this visual overview for orientation, then switch to the verified progression tool below for route requirements and source-backed details.
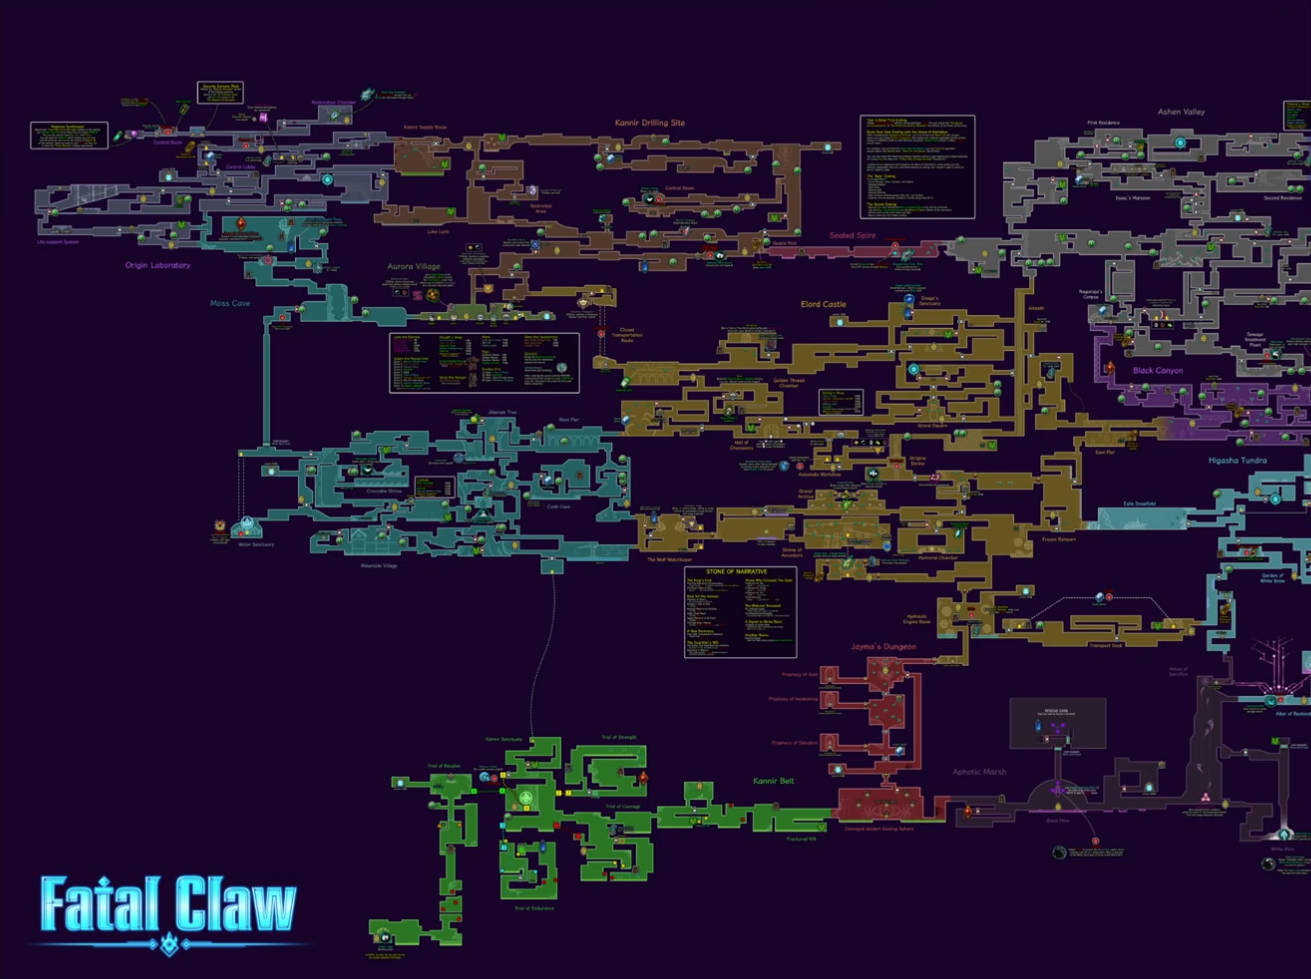
Data baseline: Fatal Claw 1.0.8, researched 2026-08-29. Community-confirmed facts are labeled separately. Exact coordinates and unverified claims remain intentionally excluded; version and evidence links stay visible so future patches can be revalidated.
The Fatal Claw map system is the friendliest part of a demanding game, and it has a name worth learning: the Carox, short for Cat, Radar, and Codex. Unlike most Metroidvanias, it is available from the first minute — the developers have said the open map was a deliberate choice to make the genre welcoming — and it does more of the navigation work for you than any other tool in the game. This hub explains what the Carox records, how fast travel actually works, and how to use both to kill the backtracking pain.
Quick answer
The Carox fills itself: rooms color in as you walk, water and barriers auto-mark, and the codex half remembers what you have read. Your job is to drop markers on every dead end and locked ledge, then sweep them each time a boss hands you a new movement ability. Fast travel runs on Stone Warp and waypoint gates, becomes useful once you hold multiple save points, and never replaces the abilities a gate is actually asking for.
Use the interactive progression map above this guide as your working layer. The progression map shows how the verified regions connect, which progression gates are encoded, and where the evidence behind each relationship comes from — filter it by bosses, abilities, keys, NPCs, and travel, then open any node or relationship for its version and source links. The sections below explain the in-game map system behind the graph.
What the Carox records from minute one
The Carox is three tools in one. The cat is Kisha's journey; the radar is where you have been — rooms fill and color-code by biome as you traverse them, including the shapes of corridors; the codex is what you have read, tracking journals and lore entries so story clues stay findable. The developers have openly said the radar idea was inspired by the gadget radars of classic adventure manga, and the design goal was a map that never makes you feel lost.
Auto-marking covers the essentials: water that hurts Kisha, barrier types, and — per player reports — the treasures the game thinks you still owe yourself. One Early Access reviewer praised exactly this, noting the game marks missing collectibles so you spend less time squinting at a grid. Treat the auto-marks as a first pass; your own markers are still the precision instrument.
Markers, pins, and the habits that pay
Every guide source agrees on the core habit, whatever the exact marker economy: pin every one-way wall, every ability-gated gap, and every sealed story door the moment you meet it. Sources differ on the fine print — one describes dropped markers as free from the start, another reports that custom marker pins are bought in shops — so check the in-game shop yourself and budget accordingly. Either way, the marker menu groups travel, route recovery, map expansion, progression, optional completion, and resupply.
Marker groups worth maintaining all run:
- Gated ledges — anything a dash, wall climb, or glide would open later.
- Sealed doors — story objects such as the Wolf Gate's requirement; these need items, not abilities.
- Statues and stones — the upgrade currencies and save nodes you will farm during sweeps.
- Shops and refill points — especially in industrial regions where the hazard tax is constant.
The developers also hid a kindness in the level design: hugging a wall shows a sliver of the map on the other side, which is why dead ends are worth ten more seconds of walking even when they look empty.
Regions as the map reads them
The underworld decomposes into biomes with distinct movement rules, and the Carox color-codes them so you can plan at a glance. The route order and each region's gimmick live in the walkthrough hub, but the map-level summary is: the Origin Laboratory stack, the Moss Cave forests, the windy Strigine Quarry, the Black Canyon, the frozen Higasha Tundra with its castle interior, the golden Elord Castle stack with its Grand Square and Mirror Chamber, Jayma's Dungeon, the industrial Kannir Belt, and 1.0's black Aphotic Marsh. Each biome changes how jumping, gliding, and climbing behave — ice slides, mud snags, quarry winds — so a route that worked one biome over may be a trap here.
Because biomes are color-coded and locally detailed, the practical workflow is region-by-region: finish a biome's fill, buy or find its map expansion if one exists, pin its gates, and move on with a clean board.
Fast travel: Stone Warp and waypoint gates
Fast travel has two layers. Stone Warp is the named fast-travel verb that appears in menu and patch text; it shines once you hold several rest points, letting you hop between stones instead of re-walking the royal mile. The second layer is the waypoint network: player reports describe teleport points that cost currency to activate, and biome-specific gate items that later make visited save points directly selectable as map destinations.
One caution has earned its place in every guide: activate the Stone Warp lever in Upper Elord Castle before you warp out. Skipping it once blocked progression for players until a patch resolved the trap, and the habit remains the cheapest insurance in the game. A rarer warp bug can drop you into an empty cutscene map — reloading or warping again clears it, so do not panic when it happens.
When the map cannot help you
The Carox cannot open anything, and that is by design. If a door stays locked, the answer is a Mutated Ability you have not earned, a story object you have not found, or — for the marsh's black sludge — the Silver Chain from the 1.0 endgame. Community guides are blunt about this: the map reduces backtrack pain, but no map pack substitutes for the boss fight that pays out the next movement tool.
That is also why the sweep habit matters more than the map itself. Every movement reward — the midair dash from Mirkam, the wall claws from Irbes — should trigger a pass over your gated-ledge markers, and the double jump guide lists which ability answers which barrier. When a marked spot still will not open after the relevant ability, it is probably a story door; take the item hunt to the walkthrough hub or the systems overview in the Fatal Claw guide hub.
Every biome changes how you move
The single most useful map habit is remembering that each region rewrites the movement rules, because the Carox shows you where you are — not what the ground will do. Community region notes summarize it well: the laboratory stack plays straight until it goes vertical, the Moss Cave layers grow damp and snarl jumps, the quarry throws wind and updrafts under every arc, the canyon floor is mud that punishes sloppy landings, the tundra freezes routes wide open, the castle plays golden and vertical, the dungeon seals its doors, the Kannir belt glows toxic green, and the marsh is black sludge that only the Silver Chain treats as ground.
Read a biome transition as a difficulty bell, not a scenery change: adjust your Cabitz, expect the local hazard, and re-pin the gates the new physics just reopened. When a transition gates you entirely, that is the walkthrough telling you a stage boss is still standing.
Map questions players ask
Does the Carox show collectibles? Partially, and increasingly so: the game auto-marks barriers, water, and — per player reports — the treasures it thinks you still owe, while the codex half tracks what you have read. Your own markers fill the gap for everything optional, which is why the marker menu groups travel, route recovery, map expansion, progression, optional completion, and resupply. One teleport-related detail from player accounts is worth budgeting for: activating a teleport point costs currency, so the first sweep of a biome carries a small bill.
Two glitches have well-documented workarounds. Warping can occasionally drop Kisha into an empty cutscene map — reloading the save or warping again clears it, so do not re-walk the route out of panic. And the teleport-layer achievement the community calls Vanrion's Gate marks the fast-travel upgrade moment; if you are achievement hunting, the guide hub explains the systems behind it. For everything the markers point at, the bosses hub and double jump guide tell you which key opens which door.
Interactive maps and what to expect from this wiki
The interactive progression map above is a verified relationship graph: it shows supported region connections, progression gates, bosses, abilities, NPCs, and evidence links without pretending to be a pixel-perfect world map. Exact coordinates and unverified claims remain intentionally excluded until they can be checked against current gameplay footage or other approved evidence. The bosses hub marks where each arena sits on the route, and the release date timeline keeps the version context clear while you play.